Easy Quick Pickled Asparagus: Crispy & Fail-Proof No-Canning
Imagine biting into a perfectly crisp, tangy spear of asparagus, bursting with a bright, zesty flavor that makes your taste buds sing. Now imagine achieving that without any complicated canning equipment or hours spent over a hot stove. Sounds like a dream, right? Welcome to the wonderful world of quick pickled asparagus – your new favorite way to enjoy this seasonal vegetable!
Far from a daunting task, making quick pickled asparagus is astonishingly simple and incredibly rewarding. This refrigerator pickling method is not only fail-proof but also guarantees crunchy, flavorful spears that are perfect for everything from elegant charcuterie boards to a simple, satisfying snack. Forget the fuss of traditional canning; this recipe is all about ease, speed, and undeniable deliciousness.
Why Quick Pickled Asparagus is a Game Changer (and So Easy!)
Asparagus season is a fleeting joy, but with quick pickling, you can capture that fresh, vibrant taste and extend its life far beyond its typical window. This method is a true game-changer for several reasons. Firstly, the "quick" in quick pickled asparagus isn't just a marketing term – it truly is fast. With minimal prep time, you can have jars of beautiful, green spears chilling in your fridge, ready to transform your meals and snacks. There's no need for specialized pressure canners or water baths, which often intimidate home cooks. This means less equipment, less time, and a whole lot less stress.
The beauty of refrigerator pickling lies in its simplicity. You're essentially creating a vibrant brine and letting your fresh asparagus soak up all that tangy goodness. Because it's stored in the refrigerator, the risk of spoilage associated with improper canning is completely eliminated, making it a truly fail-proof endeavor. This method allows you to enjoy the peak freshness of asparagus for weeks, ensuring you make the most of its brief season. For more ideas on how to Extend Asparagus Season with Tangy Quick Pickled Spears, look no further than this simple technique.
The Secret to Irresistibly Crispy Pickled Asparagus
The texture of pickled vegetables is paramount, and nobody wants a soggy spear. Achieving that satisfying snap is easier than you might think, and it all starts with how you treat your asparagus before it hits the brine. Many pickling recipes call for blanching vegetables, but for quick pickled asparagus, we have a superior technique: the ice bath.
Instead of blanching, which can partially cook the asparagus and soften its cellular structure, chilling the spears in an ice bath before pickling is the key to maximum crispness. This thermal shock method helps to firm up the asparagus, ensuring it retains its natural crunch even after soaking in the brine. Just submerge your trimmed asparagus in a bowl of ice water for about 10-15 minutes while you prepare your brine. You'll notice a remarkable difference!
When selecting your asparagus, opt for medium to thinner spears. Thicker asparagus can be tougher and may take longer to absorb the brine, potentially compromising crispness. Green asparagus is generally preferred not only for its vibrant color that pops in a jar but also for its more common availability and usually lower cost compared to white asparagus.
Trimming asparagus doesn't have to be a chore. The easiest and most reliable method is to gently bend each spear until it naturally snaps. It will break precisely where the tough, woody end meets the tender, edible stalk, ensuring perfect results every time.
Crafting Your Perfect Pickling Brine: Ingredients & Flavor Boosters
The brine is the heart of your quick pickled asparagus, infusing it with flavor and preserving its freshness. A balanced brine typically consists of vinegar, water, and salt, but the real magic happens when you start adding aromatics and spices to create a truly unique profile.
Core Brine Ingredients:
- Vinegar: Distilled white vinegar is a classic choice for its clean, sharp acidity, but apple cider vinegar can also be used for a slightly fruitier, milder tang. The vinegar component is crucial as its acidity inhibits bacterial growth, allowing for safe refrigerator storage.
- Water: Used to dilute the vinegar, balancing the acidity and ensuring the brine isn't overwhelmingly sour. A common ratio is 1:1 vinegar to water, though you can adjust slightly based on your preference for tanginess.
- Salt: Pickling salt is ideal because it's finely ground and free of anti-caking agents that can cloud your brine. However, kosher salt is an excellent readily available alternative. Avoid iodized table salt, as it can impart a metallic taste and cloudy appearance.
Flavor Boosters (Optional but Highly Recommended!):
This is where you can truly customize your quick pickled asparagus. Think beyond basic and get creative!
- Garlic: A few cloves of fresh garlic, sliced or smashed, add a wonderful aromatic depth.
- Dill: Fresh dill sprigs are a classic pairing for pickles, offering a fresh, herbaceous note.
- Mustard Seeds: These add a subtle pungency and a pleasing texture.
- Pickling Spice Mix: Many pre-made mixes contain a harmonious blend of peppercorns, coriander, bay leaf, and other spices, simplifying the flavor-building process.
- Other Spices: Consider individual whole spices like bay leaves, black peppercorns, coriander seeds, or a pinch of red pepper flakes for a subtle kick.
The key is to heat your brine ingredients gently, allowing the salt to dissolve and the flavors of your chosen spices to meld before pouring it over your chilled asparagus.
Step-by-Step Guide to Fail-Proof Quick Pickled Asparagus
Ready to make your own batch of incredible quick pickled asparagus? Here's how to do it with ease:
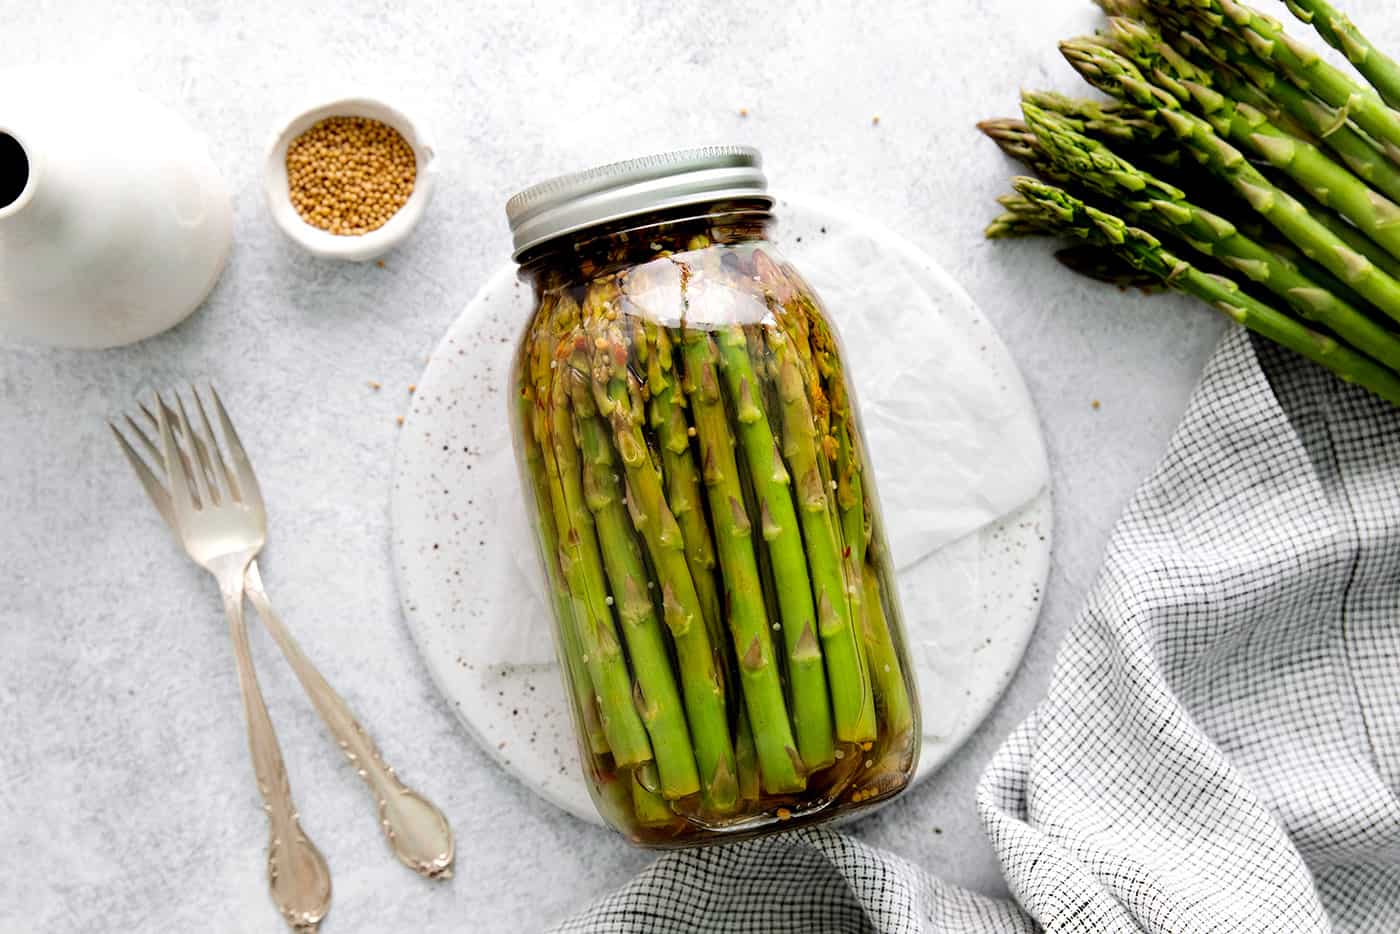
- Prepare Your Asparagus: Wash 1 pound of medium to thin asparagus spears thoroughly. Trim the woody ends using the bend-and-snap method. Immediately submerge the trimmed spears in a bowl of ice water for 10-15 minutes while you prepare the brine.
- Sterilize Your Jars: While this is refrigerator pickling and not traditional canning, it's still good practice to ensure your jars are clean. Wash pint, pint-and-a-half, or quart-sized mason jars (or even specialized asparagus jars if you have them) and their lids in hot, soapy water, then rinse thoroughly. You can also run them through a hot cycle in your dishwasher.
- Prepare Your Brine: In a non-reactive saucepan, combine equal parts vinegar (e.g., distilled white or apple cider) and water. Add about 1 tablespoon of pickling or kosher salt per cup of liquid, adjusting to taste. Introduce your chosen flavor boosters – think 2-3 cloves of sliced garlic, a teaspoon of mustard seeds, a few sprigs of fresh dill, or a tablespoon of pickling spice mix per pint jar. Bring the mixture to a gentle boil, then reduce heat and simmer for 2-3 minutes to dissolve the salt and infuse the flavors.
- Pack the Jars: Drain the asparagus from the ice bath and pat them dry. Tightly pack the spears upright into your clean jars, leaving about ½ inch of headspace from the rim. Add any fresh aromatics like dill sprigs or extra garlic directly into the jars with the asparagus.
- Pour the Brine: Carefully pour the hot brine over the asparagus, ensuring the spears are completely submerged. Tap the jars gently on the counter to release any air bubbles. If necessary, top off with more brine.
- Seal and Chill: Securely fasten the lids onto the jars. Allow the jars to cool to room temperature on the counter for about an hour. Once cooled, transfer them to the refrigerator.
Your quick pickled asparagus will be ready to enjoy once fully chilled, but for the best flavor development, we recommend waiting at least 2-3 days before digging in. The flavors will deepen and meld beautifully over time. Consume your refrigerator pickles within 3-4 weeks for optimal freshness and taste.
Beyond the Jar: Creative Ways to Enjoy Your Pickled Spears
Once you've mastered the art of making quick pickled asparagus, you'll find countless ways to incorporate these tangy, crunchy delights into your culinary repertoire. They are far more versatile than just a snack straight from the jar!
- Appetizer Boards: A natural fit for charcuterie, cheese boards, and relish trays. Their bright flavor cuts through rich cheeses and meats beautifully.
- Garnish Galore: Elevate your cocktails! They are the perfect, zesty garnish for a Bloody Mary or a dirty martini.
- Salad Superstars: Chop them up and add them to green salads, potato salads, or pasta salads for an unexpected burst of flavor and texture.
- Sandwich & Wrap Enhancers: Slice them thinly or keep them whole to add a tangy crunch to sandwiches, burgers, or wraps.
- Side Dish Sensation: Serve them alongside grilled meats, roasted chicken, or fish to brighten up your plate.
- Breakfast Brilliance: Finely chop them and mix into scrambled eggs or an omelet for a delightful morning twist.
The possibilities are truly endless, limited only by your imagination. For even more inventive ideas on how to use these delicious spears, check out our guide: Beyond Salad: Creative Ways to Use Quick Pickled Asparagus.
Embrace the simplicity and deliciousness of quick pickled asparagus. This fail-proof, no-canning method ensures you'll have perfectly crispy, tangy spears ready to brighten any meal or snack. So, next time asparagus season rolls around, grab an extra bundle and get pickling – your taste buds will thank you!
